Whether it’s driving, chipping or putting, train the body parts that govern the movement.
[Photographs by J.D. Cuban]
When you’re looking to improve from tee to green, it’s important to understand which parts of your body should control the swing. But here’s the thing: the prime movers change depending on the type of swing you’re trying to make. For example, the muscles most responsible for your driver swings should be the least active when you putt. And the “engine” of your chips is different from what you call upon for a full iron shot.
Not only is it important to know the muscles that govern each type of shot, you also should know the order they need to “fire” to execute the swing. The sequence of movement is crucial to get right, no matter the play. The problem is, a lot of golfers are overactive with the wrong parts of the body – and at the wrong times – which leads to poor execution. While working with hundreds and hundreds of amateurs, I’ve found many mistakes are often from a lack of understanding of what they’re supposed to do. If that’s you, let me help you get it right.
On the following pages, I’m first going to explain what muscles are key to the three most common swings in golf – putts, greenside shots and full-swing shots – and then I’ll tell you how to correctly sequence the activity for each. Finally, to really engrain the fundamental movements, I’ll give you some drills that will turn all of this into good mechanics when you play. Whether you’re looking to hit it farther, get up and down more often around the greens or hole more par and birdie putts, these tips on how to “start your engines” can lead to big gains on the golf course. Let’s begin with your putting stroke.

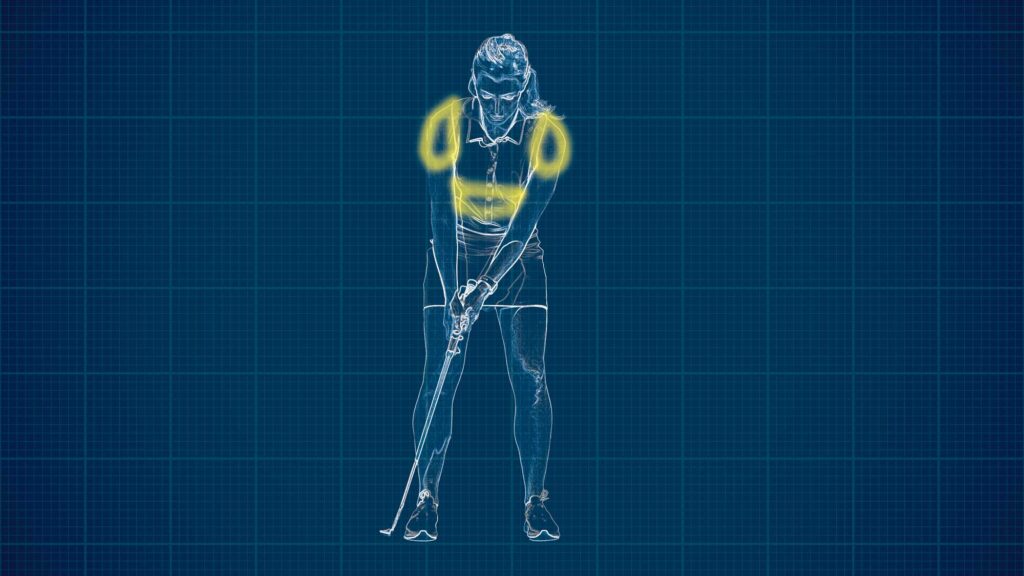
Putting: Recruit your upper body
Note the highlighted area of my body [above right]. Think of it like a heat map that reveals the true engine of the putting stroke. The big muscles of your upper body, not the smaller ones in your arms, are what provide the motion, delivering the putter’s face squarely into the ball.
I want you to imagine that your putter is a pendulum and to think of your shoulders, back and upper core muscles as the rigid support that suspends the putter’s shaft. Now pick a fixed point in the centre of your chest for your pendulum to pivot back and through. Choosing a high pivot point will help you avoid leading with the hands and arms, which is a common sequence fault that leads to less control of the face and stroke. Focusing on your shirt buttons is a good visual to use as the fixed axis.
The stroke is a small, controlled rotation around your spine – not a rocking motion up and down. Feel the upper-body muscles working together as they deliver the clubface into the ball smoothly with no flicking of the hands and wrists.

The Drill
Hold your putter so the butt end is touching your sternum [left]. Keep a soft bend in your arms, letting your hands find their natural distance from your body. Standing in your normal putting setup, make a few smooth strokes letting the putterhead move while the butt end stays fixed into your sternum. Everything should feel connected but not stiff. As you practise this motion, understand that your spine is the axis you’re moving the puttherhead around. You should feel your shoulders, back and upper core muscles working together as the engine of the stroke.
Repeat this “anchored” practice drill for a few minutes, and then go back to hitting some putts trying to recreate the feel of the anchored stroke. The goal is to maintain that high pivot point as you swing back and through.

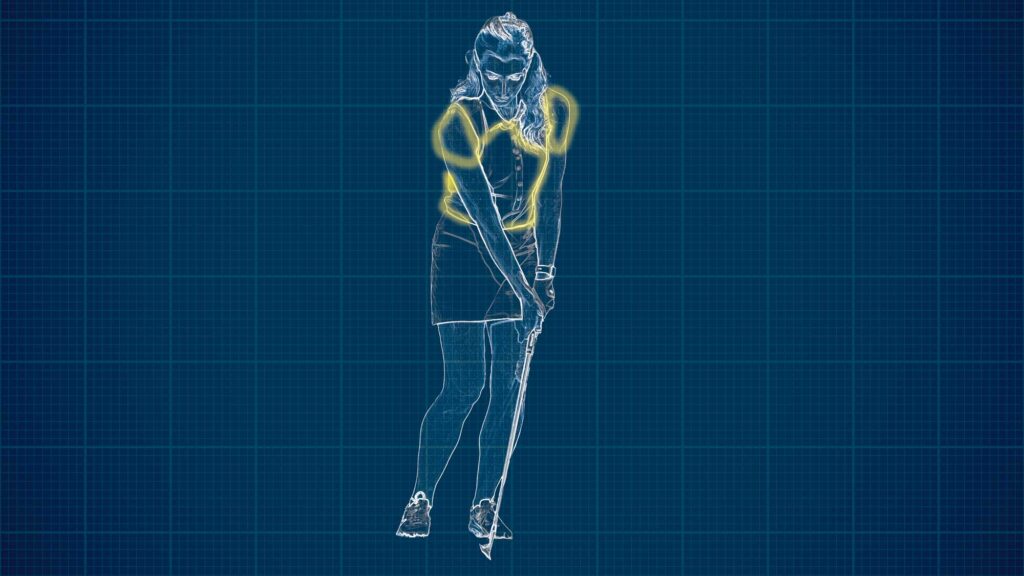
Short Shots: Get Your Midsection Involved
This heat map [above right] shows that short shots recruit some of the same muscles as a putting stroke. The upper body is definitely involved. The difference is that the lower core muscles and hips are also part of the engine. From the shoulders down to the pelvis, everything is moving as one unit in these greenside shots – that’s the proper sequencing.
Start in a narrow stance with your feet and hips slightly open in relation to your target and weight on your front foot. This open stance presets some of the hip rotation needed to propel the arms and club into a good impact position. Favouring your front foot will help you rotate your hips and upper body over your front leg like it’s a post. A common mistake I see is failing to keep your weight forward in an attempt to help the ball airborne.
When you take the club back, your wrists should hinge in proportion to the swing (bigger swings call for more hinge). Then it’s a matter of rotating your body as a unit towards the target, letting the club glide along the turf.
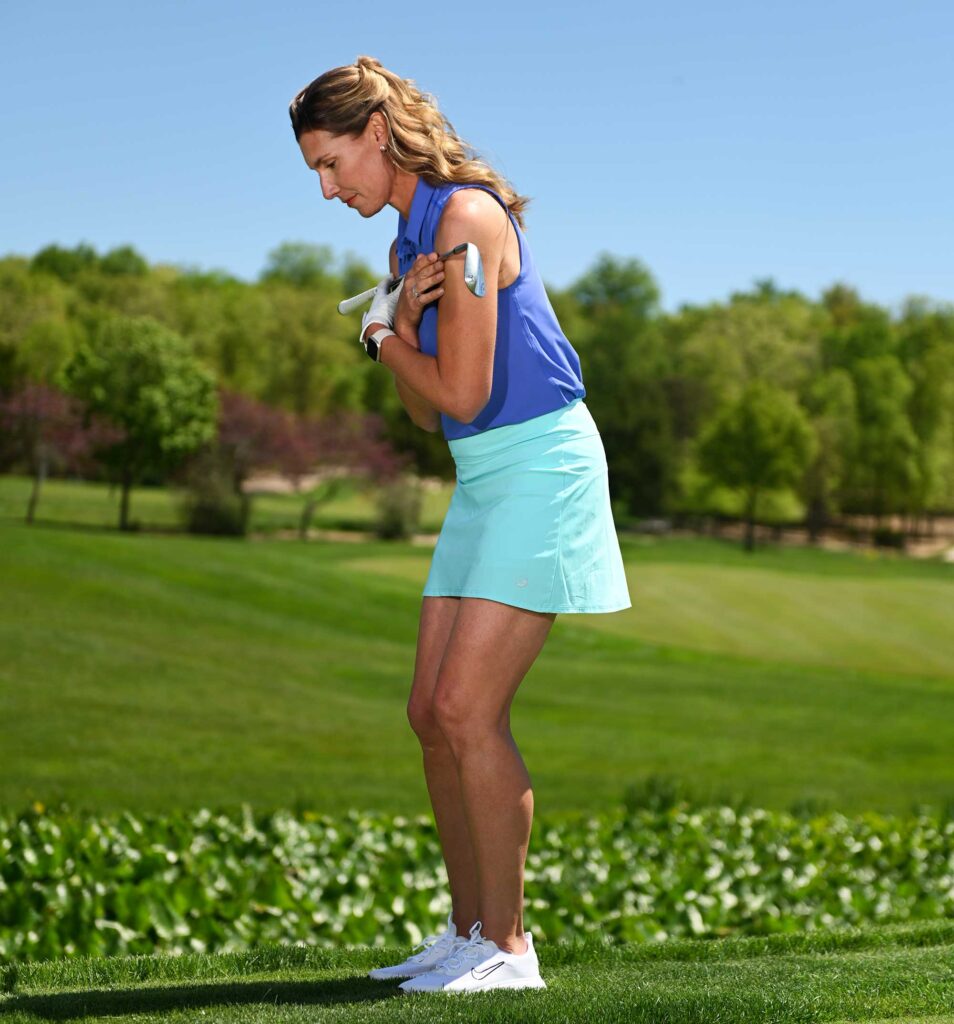

The Drill
Grab a wedge, hold it across your upper body, then mimic your normal chipping setup [left]. Be sure to position your nose over your front leg and put most of your weight on that leg as you get in position. Now make a few small club-less swings pivoting a little over and around your front leg. After a few reps, expand your rotation and let your pelvis and upper body move towards the target as one unit [above].
Once you feel confident in your ability to pivot the hips, core and torso together over your front leg, it’s time to take that wedge off your chest and hit some greenside shots. Again, your focus should be moving the club with your body rotation – not solely with your arms. If you keep your weight planted firmly on that front foot and rotate, the club will skim along the turf and pop the ball up effortlessly.


Full Swing: Lead With Your Legs
Referencing the heat map one last time, you can see the lower body is mostly responsible for powering the full swing. During the backswing, you want to transfer most of your weight into the trail leg, planting firmly. Once you’ve loaded up on that trail leg and are ready to swing down into the ball, use your feet to start the sequence. Shift your weight towards the target and then fire your hips at it. Remember that your arms should follow this shift-and-fire move. Many golfers start down with the arms first, but that’s incorrect sequencing and leads to a lot of issues including slices, pulls and poor contact.
If you want to straighten out your shots and add some more pop to them, lead with the legs. Pushing against the ground forcefully causes your lower body to naturally unwind ahead of your arms and club. This creates a rubber-band effect that unleashes your clubhead through the impact zone with a lot of speed. I call this action “uncoiling from the top”, and it happens as a result of that hard push off with your lead leg.
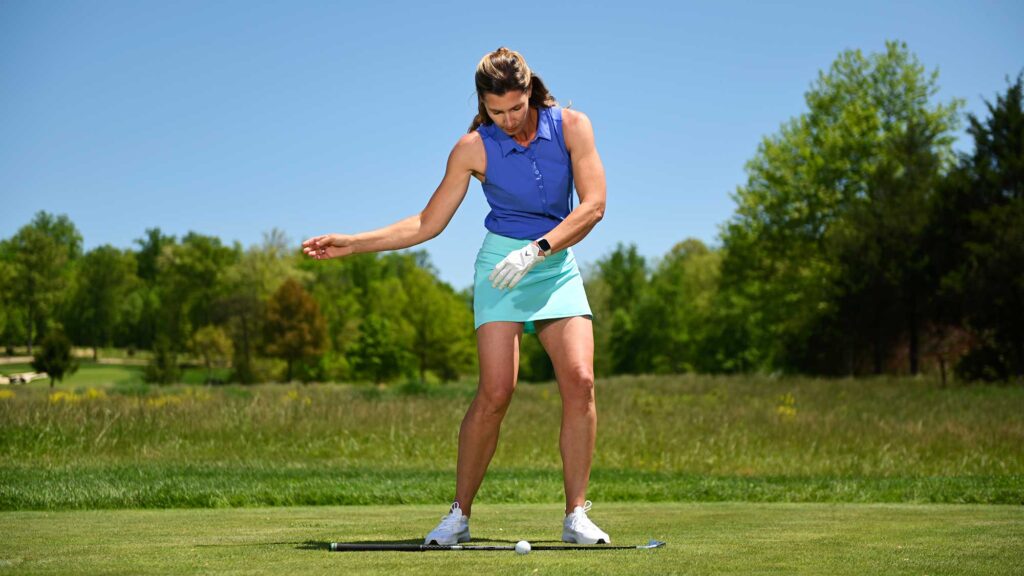
The Drill
Ditch your clubs, but get into your address posture for an iron shot, letting your arms hang about a foot apart. Try to maintain this gap as you mimic your backswing. Pause at the end of it, and then pretend you’re swinging down and through. I want you to imagine that all the muscles of the upper body have turned off. Your lower body should rotate towards the target while your arms lag behind, feeling like passengers along for the ride [above]. Continue making these “rag doll” arm swings without pausing to reset, letting the end of one flow into the start of the next.
Similarly to how the putting stroke is governed by the upper body and the mid body plays a key role in short-game shots, rehearsing this lower-body-first through-swing will help you fire up the right engine and properly sequence your full swings.
Golf Digest Teaching Professional Erika Larkin, one of the 50 Best Teachers in America, is located at The Club at Creighton Farms in Virginia


